

Notification Settings
Nezha Monitor can monitor server load, CPU, memory, disk, traffic, monthly traffic, process count, and connection count, and send notifications when user-defined thresholds are reached.
Flexible Notification Methods
- In panel messages,
#DATETIME#represents the timestamp when the event occurred and is automatically replaced with the actual time when a notification is triggered. #NEZHA#is the panel message placeholder and is automatically replaced with the actual message content when a notification is triggered.- Request body format:
- When the request type is FORM, use
key:valueformat.valuecan contain placeholders that are automatically replaced during notification. - When the request type is JSON, simple string replacement is performed and the result is submitted directly to the
URL.
- When the request type is FORM, use
- The URL can also contain placeholders, which are replaced during the request.
- Verify TLS: When enabled, HTTPS notification requests verify the certificate chain and domain. If the notification service uses a self-signed certificate or internal test certificate, you may need to disable this option.
- Skip Check: When adding or modifying a notification method, the Dashboard sends a test message by default. After checking “Skip Check”, the configuration is saved directly. This is useful when the notification service is temporarily unreachable but you are sure the parameters are correct.
- Format Metric Units: If “Format Metric Units” is enabled,
#SERVER.CPU#,#SERVER.MEM#,#SERVER.SWAP#,#SERVER.DISK#,#SERVER.SPEEDIN#,#SERVER.SPEEDOUT#,#SERVER.TRANSFERIN#, and#SERVER.TRANSFEROUT#output human-readable values with units, such as12.34 %,1.23 GB, and10.50 MB/s. If disabled, these placeholders keep their raw numeric values, which is suitable for webhooks that need pure numbers. - Webhook Target Restrictions: Notification URLs only support
httpandhttps. For security reasons, the Dashboard rejects notification requests pointing to localhost, private networks, link-local addresses, reserved addresses, multicast addresses, and other non-public targets, and it does not automatically follow redirects. If you need to push to an internal service, receive the notification through a publicly accessible relay first. - Editing Sensitive Fields: The API and admin frontend do not display the URL, request headers, or request body when reading a notification method. Re-enter the URL when editing. Leaving headers or body empty preserves their stored values. To clear stored headers or body, delete and recreate the notification method.
Refer to the following notification examples. You can also customize push methods as needed.
Supported Placeholders
| Placeholder | Meaning |
|---|---|
#NEZHA# | Notification content |
#SERVER.ID# | Server ID |
#SERVER.NAME# | Server name |
#SERVER.IP# | Server IP |
#SERVER.IPV4# | Server IPv4 address |
#SERVER.IPV6# | Server IPv6 address |
#SERVER.CPU# | CPU usage, outputs a percentage when “Format Metric Units” is enabled |
#SERVER.MEM# | Memory usage, outputs a percentage when “Format Metric Units” is enabled |
#SERVER.SWAP# | Swap usage, outputs a percentage when “Format Metric Units” is enabled |
#SERVER.DISK# | Disk usage, outputs a percentage when “Format Metric Units” is enabled |
#SERVER.SPEEDIN# | Real-time inbound speed, outputs KB/s, MB/s, etc. when “Format Metric Units” is enabled |
#SERVER.SPEEDOUT# | Real-time outbound speed, outputs KB/s, MB/s, etc. when “Format Metric Units” is enabled |
#SERVER.TRANSFERIN# | Total inbound traffic, outputs KB, MB, GB, etc. when “Format Metric Units” is enabled |
#SERVER.TRANSFEROUT# | Total outbound traffic, outputs KB, MB, GB, etc. when “Format Metric Units” is enabled |
#SERVER.CPUUSED# | Raw CPU value |
#SERVER.MEMUSED# | Used memory in bytes |
#SERVER.MEMTOTAL# | Total memory in bytes |
#SERVER.SWAPUSED# | Used swap in bytes |
#SERVER.SWAPTOTAL# | Total swap in bytes |
#SERVER.DISKUSED# | Used disk in bytes |
#SERVER.DISKTOTAL# | Total disk in bytes |
#SERVER.NETINSPEED# | Raw inbound speed in bytes/second |
#SERVER.NETOUTSPEED# | Raw outbound speed in bytes/second |
#SERVER.NETINTRANSFER# | Raw inbound traffic in bytes |
#SERVER.NETOUTTRANSFER# | Raw outbound traffic in bytes |
#SERVER.LOAD1# | 1-minute load |
#SERVER.LOAD5# | 5-minute load |
#SERVER.LOAD15# | 15-minute load |
#SERVER.TCPCONNCOUNT# | TCP connection count |
#SERVER.UDPCONNCOUNT# | UDP connection count |
Bark Example
Expand/collapse
- Name: Bark
- URL composition:
- GET request:
/:key/:body,/:key/:title/:body, or/:key/:category/:title/:body - POST request:
/push
- GET request:
- Request method:
- GET or POST
- Request type:
- GET request: default
- POST request:
form
- Body:
- GET request: empty
- POST request:json
{
  "title": "#SERVER.NAME#",
  "device_key": "xxxxxxxxx",
  "body": "#NEZHA#",
  "icon": "https://xxxxxxxx/nz.png"
}
Slack Example (Contributed by @cantoblanco)
Expand/collapse
Get URL Parameters
- Create a Slack App: Create a new app at Slack API.
- Add Incoming Webhook: Add Incoming Webhooks on the app feature page and activate them.
- Generate Webhook URL: Click “Add New Webhook to Workspace”, select a channel, and authorize it to get the Webhook URL.
Notification configuration:
- Name: Slack
- URL:
https://hooks.slack.com/services/XXXXXXXXX/XXXXXXXXX/XXXXXXXXXXXXXXXXXXXXXXXX - Request method:
POST - Request type:
JSON - Body:json
{
  "text": "#NEZHA#"
}
ServerChan Example
Expand/collapse
Simple example:
- Name: ServerChan
- URL:
https://sc.ftqq.com/SCUrandomkeys.send?title=Nezha notification&desp=#NEZHA# - Request method:
GET - Request type: default
- Body: empty
Advanced example:
- Name: ServerChan
- URL:
https://sc.ftqq.com/SCUrandomkeys.send - Request method:
POST - Request type:
FORM - Body:json
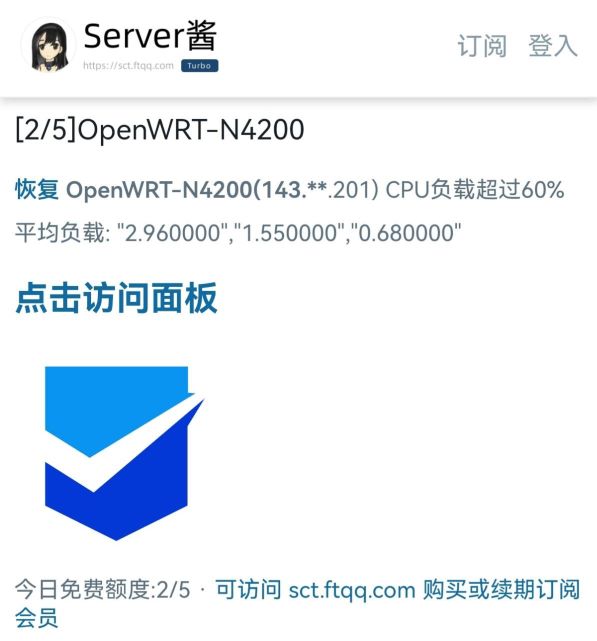
{ "title": "#SERVER.NAME#", "desp": "**#NEZHA#\n\nAverage load: \"#SERVER.LOAD1#\",\"#SERVER.LOAD5#\",\"#SERVER.LOAD15#\"\n\n## [Open Dashboard](https://your-dashboard-domain)\n\n" }
Notification preview:
Telegram Example (Contributed by @cantoblanco)
Expand/collapse
Get URL Parameters
- Get bot token: Chat with @BotFather, send
/newbotto create a new bot, and get the token. - Get user ID: Chat with @userinfobot to get your user ID.
- Chat with the bot: Send a message to the newly created bot first to ensure it can send messages to you.
Notification configuration:
- Name: Telegram
- URL:
https://api.telegram.org/bot<your-bot-token>/sendMessage?chat_id=<your-user-id>&text=#NEZHA# - Request method:
GET - Request type: default
- Body: empty
Note: Replace <your-bot-token> and <your-user-id> with actual values.
wxpusher Example
Expand/collapse
Follow your application in advance.
- Name: wxpusher
- URL:
http://wxpusher.zjiecode.com/api/send/message - Request method:
POST - Request type:
JSON - Body:json
{
  "appToken": "your appToken",
  "topicIds": [],
  "content": "#NEZHA#",
  "contentType": "1",
  "uids": ["your uid"]
}
Email Notification Example (Using SendCloud, Contributed by @cantoblanco, @erbanku)
Expand/collapse
Note: SendCloud has a daily free email quota. This is only an example.
Get URL Parameters
- Register an account:
- China SendCloud: Register and log in at SendCloud.
- International SendCloud: Register and log in at SendCloud.
- Get APIUSER and APIKEY: Get them from account settings.
- Set sender and recipient email: Customize sender and recipient email addresses.
Notification configuration:
- Name: Email notification
- URL (China version):
https://api.sendcloud.net/apiv2/mail/send?apiUser=<APIUSER>&apiKey=<APIKEY>&from=<sender-email>&fromName=Nezha&to=<recipient-email>&subject=Nezha-Notification&html=#NEZHA# - URL (International version):
https://api2.sendcloud.net/api/mail/send?apiUser=<APIUSER>&apiKey=<APIKEY>&from=<sender-email>&fromName=Nezha&to=<recipient-email>&subject=Nezha-Notification&html=#NEZHA# - Request method:
POST - Request type:
JSON - Header: empty
- Body: empty
Note: Replace <APIUSER>, <APIKEY>, <sender-email>, and <recipient-email> with actual values.
DingTalk Group Bot Example
Expand/collapse
Get URL Parameters
- Create a bot: Add a bot in DingTalk group settings and select custom keyword mode.
- Get Webhook URL: Obtain it after creation.
Notification configuration:
- Name: Nezha Monitor Bot
- URL:
https://oapi.dingtalk.com/robot/send?access_token=xxxxxxxxxxxxxxxxx - Request method:
POST - Request type:
JSON - Header:json
{ "Content-Type": "application/json" } - Body:json
{
  "msgtype": "text",
  "text": {
    "content": "Nezha Monitor:\n#NEZHA#"
  }
}
Note: Replace access_token with your bot token, and the content must include your custom keyword.
WeCom Group Bot Example (Contributed by @ChowRex)
Expand/collapse
Configuration Example
- Name: WeCom group bot
- URL:
https://qyapi.weixin.qq.com/cgi-bin/webhook/send?key=YOUR_BOT_KEY - Request method:
POST - Request type:
JSON - Body:json
{
  "msgtype": "markdown",
  "markdown": {
    "content": "# Nezha Notification\n\n#NEZHA#\n\n> **Name**: #SERVER.NAME#\n> **IP**: #SERVER.IP#\n> **CPU**: #SERVER.CPU#%\n> **Memory**: #SERVER.MEM#%\n> **Disk**: #SERVER.DISK#%\n"
  }
}
Notification preview:

Feishu Group Bot Example (Contributed by @eya46)
Expand/collapse
Get URL Parameters
- Create a bot: Add a custom bot (Webhook) in Feishu group settings.
- Get Webhook URL: Obtain it after creation.
Notification configuration:
- Name: Nezha Dashboard Bot
- URL:
https://open.feishu.cn/open-apis/bot/v2/hook/xxxxxxxxxxxxxxxxx - Request method:
POST - Request type:
JSON - Body:json
{
  "msg_type": "text",
  "content": {
    "text": "#NEZHA#\n#DATETIME#"
  }
}
Matrix Notification Example
Expand/collapse
Parameter Description
- Variable replacement: Replace these variables with actual values:
$YOUR_HOME_SERVER: Matrix server address$YOUR_NEZHA_URL: Your Nezha Dashboard URL$YOUR_MATRIX_USERNAME: Matrix username$YOUR_MATRIX_PASSWD: Matrix password$YOUR_MATRIX_TOKEN: Matrix access token$ROOM_ID: Matrix room ID
Retrieve Access Token
Use this command to get YOUR_MATRIX_TOKEN:
curl -XPOST -d '{"type": "m.login.password", "identifier": {"user": "$YOUR_MATRIX_USERNAME", "type": "m.id.user"}, "password": "$YOUR_MATRIX_PASSWD"}' "https://$YOUR_HOME_SERVER/_matrix/client/r0/login"Notification Configuration
- Name: Matrix
- URL:
https://$YOUR_HOME_SERVER/_matrix/client/r0/rooms/$ROOM_ID/send/m.room.message - Request method:
POST - Request type:
JSON - Header:json
{ "Authorization": "Bearer $YOUR_MATRIX_TOKEN" } - Body:json
{
  "msgtype": "m.text",
  "format": "org.matrix.custom.html",
  "formatted_body": "<h1><a href=\"$YOUR_NEZHA_URL\" target=\"_blank\">Nezha Dashboard</a></h1><ul><li>Time: #DATETIME#</li><li>Message: #NEZHA#</li></ul>",
  "body": "#NEZHA#"
}
Steps to use:
- Replace variables: Replace all variables beginning with
$with your actual values. - Get token: Use the command above to get
YOUR_MATRIX_TOKEN. - Configure request: Fill in URL, Header, and Body according to the configuration.
- Send notifications: After configuration, notifications are sent to the specified Matrix room.
Alert Rule Description
Before configuring alert rules, configure notification methods first, then configure notification groups for notification methods in group settings. Alert rules send notifications by notification group.
Basic Rules
type: Select one or more types. A notification is triggered only when all selected types are satisfied at the same time.- Resource:
cpu,gpu,memory,swap,disk - Network:
net_in_speed(inbound speed),net_out_speed(outbound speed),net_all_speed(bidirectional speed),transfer_in(inbound traffic),transfer_out(outbound traffic),transfer_all(bidirectional traffic) - System:
offline(offline monitoring),load1,load5,load15(load),process_count(process count) - Connections:
tcp_conn_count,udp_conn_count - Temperature:
temperature_max(maximum temperature value)
- Resource:
duration: An integer of at least 3, specifying an observation window ofduration × 3seconds. Evaluation uses time covered by reports. A normal threshold rule triggers when values are outside the allowed range for more than 70% of the window, with sufficient data coverage. Offline rules use a continuous offline window; actual trigger timing varies with the check cadence.min/max:- Traffic and speed units are bytes (1KB=1024B, 1MB=1024*1024B).
- Memory, disk, and CPU use percentages (0-100).
- Offline monitoring does not need this item.
cover:0: Monitor all servers. Useignoreto ignore specific servers.1: Ignore all servers. Useignoreto select specific servers for monitoring.
ignore: Used withcoverto specify server monitoring strategy, in the format{server ID: true/false}.
Metric rules use distinct fresh reports; the same report is not counted repeatedly. Reports older than 6 seconds, missing GPU data, or zero denominators such as unavailable total memory make the relevant condition unknown. Unknown data neither starts an incident nor sends a recovery; a new window must accumulate once data becomes available again. A compound rule cannot decide an incident or recovery while any applicable condition is unknown. Configure offline alerts separately from CPU, GPU, and other resource alerts.
An offline-only rule still advances with the check clock: it observes offline status when reports are older than 6 seconds or a disconnected state stream has cleared the active state, then accumulates the configured window. duration: 10 means an approximately 30-second offline observation window, not guaranteed delivery exactly 30 seconds after the last report. Notification network latency adds further delay.
Examples:
Offline notification:
- Name: Offline notification
- Description: Notify after approximately 30 seconds of continuous downtime.
- Rule:json
[{"type": "offline", "duration": 10}] - Enabled: checked
CPU and memory monitoring:
- Name: CPU+Memory
- Rule:json
[ {"type": "cpu", "min": 0, "max": 50, "duration": 10}, {"type": "memory", "min": 20, "max": 0, "duration": 20} ] - Enabled: checked
Send notifications for specific servers to specified notification groups:
Scenario: Servers 1 and 2 send notifications to notification group A after being offline for 10 minutes; servers 3 and 4 send notifications to notification group B after being offline for 10 minutes.
Rule 1 (notification group A):
- Name: Servers 1 and 2 offline notification
- Rule:json
[{"type": "offline", "duration": 200, "cover": 1, "ignore": {"1": true, "2": true}}] - Notification group: A
- Enabled: checked
Rule 2 (notification group B):
- Name: Servers 3 and 4 offline notification
- Rule:json
[{"type": "offline", "duration": 200, "cover": 1, "ignore": {"3": true, "4": true}}] - Notification group: B
- Enabled: checked
Special Rule: Any-Period Traffic Notification
This can be used for monthly traffic monitoring.
type:transfer_in_cycle: inbound traffic during the cycletransfer_out_cycle: outbound traffic during the cycletransfer_all_cycle: total bidirectional traffic during the cycle
cycle_start: Statistics cycle start date in RFC3339 format, such as2022-01-01T00:00:00+08:00.cycle_interval: Number of statistics cycles, such as every 1 month.cycle_unit: Statistics cycle unit. Optional values:hour,day,week,month,year.min/max,cover, andignoreare the same as basic rules.
Example:
Monthly traffic over-limit notification:
Rule:
json[ { "type": "transfer_out_cycle", "max": 1099511627776, "cycle_start": "2022-01-01T00:00:00+08:00", "cycle_interval": 1, "cycle_unit": "month", "cover": 1, "ignore": {"3": true, "4": true} } ]Description: A notification is triggered when monthly outbound traffic for servers 3 and 4 exceeds 1TB. The statistics cycle starts on the 1st day of each month.
TIP
If you are unsure about alert rules, use these third-party configuration generators to simplify setup. Nezha Monitor does not provide any guarantee for third-party generator functionality:
- Nezha Rule Generator: suitable for most scenarios.
- NEZHA Config Generator: focused on cycle traffic notification rule generation. Select “traffic monitoring code” at the top.
Notification Trigger Modes
- Always: Continues attempting delivery during an incident. Successful sends are subject to notification mute intervals; not every report produces an actual delivery.
- Once: Sends one successful notification for each incident/recovery transition. Failed sends are still retried rather than suppressing the notification merely because it was attempted.
Incident and recovery delivery for the same rule/server pair is serialized. A new state cancels retries for the old state that have not started, and recovery cannot overtake an in-flight incident request. Success is tracked per notification method in the group, so failed recipients remain retryable; an empty group is not a successful send. This does not guarantee exactly-once delivery at a third-party receiver.
Execute Tasks on Notification
If you need to execute a specific task while sending notifications, configure:
- Incident tasks (
fail_trigger_tasks): In Always mode, each evaluable failed check may trigger them; in Once mode, only a new incident triggers them. - Recovery tasks (
recover_trigger_tasks): Trigger when a known incident returns to normal.
Configure tasks on the Tasks page first. Task execution is not conditional on successful notification delivery. Do not use Always mode for tasks that are unsafe to repeat.